What is OpenStack?
OpenStack is an open-source cloud platform that allows organizations to build and manage their own cloud infrastructure—similar to public cloud providers like AWS or Google Cloud, but fully under their own control.
Instead of running each server separately, OpenStack combines all your hardware resources (compute, storage, and networking) into a single, unified cloud. Users can then create virtual machines, attach storage, and set up networks quickly and easily, all through a web dashboard (Horizon) or command-line tools.
Why OpenStack matters
- Full ownership: Your data and infrastructure stay in your hands, without depending on third-party providers.
- Flexibility: It supports virtual machines, block storage, object storage, networking, and more.
- Cost efficiency: No license fees, and it’s customizable for your exact needs.
- Proven technology: Used by enterprises, research labs, telecoms, and universities worldwide.
Who uses OpenStack?
- Enterprises building private clouds.
- Government agencies and universities managing large IT resources.
- Tech companies and startups that need scalable, reliable cloud environments.
How this connects to your setup
In the following guide, you’ll learn how to deploy OpenStack with Kolla-Ansible on Ubuntu 24.04. Kolla-Ansible makes it easier to install and manage OpenStack services inside Docker containers, giving you a production-ready cloud environment.
We’ll walk through the exact steps for setting up a Controller node, a Compute node, and a Virtual IP (VIP) on your management network—so by the end, you’ll have your very own functional OpenStack cloud.
OpenStack with Kolla-Ansible on Ubuntu 24.04 (Controller + Compute)
This guide shows how to deploy OpenStack using Kolla-Ansible on: • Controller Node: 192.168.20.11 • Compute Node: 192.168.20.12 • Virtual IP (VIP): 192.168.20.254 on management network (ens34)
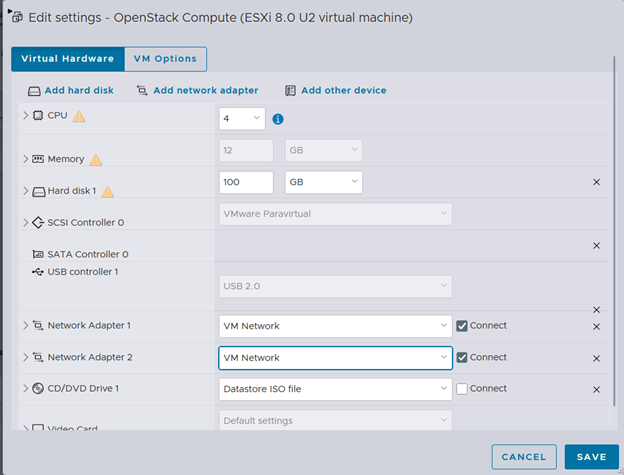
ESXi (no new uplink) • On both VMs (controller and compute), set Network Adapter 2 = VM Network (the same Port Group used for management on the same vSwitch/uplink). • In that Port Group’s Security settings, set Promiscuous = Accept, MAC address changes = Accept, Forged transmits = Accept. • Inside Linux, keep ens35 UP with no IP address.
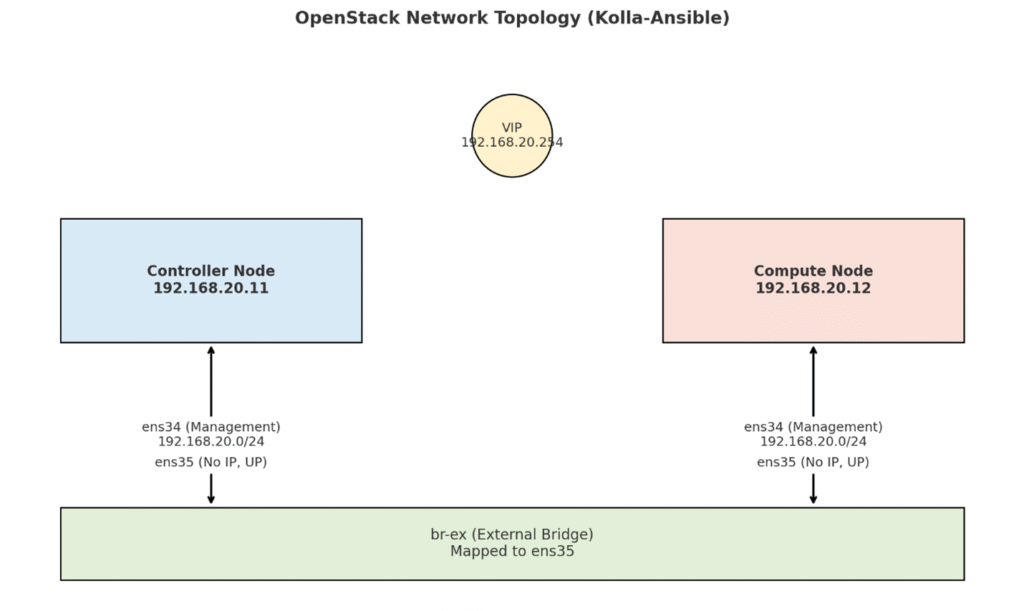
- ens34 → Management network (192.168.20.0/24) on both nodes
- VIP = 192.168.20.254 on the same management network
- ens35 → No IP (only UP), used for external connectivity
- br-ex → External bridge mapped to ens35

1. Prepare Both Nodes
Run as root on both controller and compute:
bash
					apt update && apt upgrade -y
apt install -y python3-dev libffi-dev gcc libssl-dev \
               python3.12-venv python3-pip git sshpass \
               libyaml-dev python3-yaml
Create the kolla user and allow passwordless sudo:
Bash
					useradd -m -s /bin/bash kolla
echo "kolla ALL=(ALL) NOPASSWD:ALL" > /etc/sudoers.d/kolla
Set a password for SSH access:
bash
passwd kolla
Edit /etc/hosts on both nodes:
bash
vi /etc/hosts
Add:
					192.168.20.11   controller
192.168.20.12   compute
192.168.20.254  openstack-vip
1.1 Configure ens35 (External Interface)
Edit the netplan config file /etc/netplan/50-cloud-init.yaml on controller:
yaml
					network:
  version: 2
  ethernets:
    ens34:
      addresses:
      - "192.168.20.11/24"
      nameservers:
        addresses:
        - 192.168.20.1
        search:
        - shiraz.local
      routes:
      - to: "default"
        via: "192.168.20.1"
    ens35:
      dhcp4: no
On compute:
yaml
					network:
  version: 2
  ethernets:
    ens34:
      addresses:
      - "192.168.20.12/24"
      nameservers:
        addresses:
        - 192.168.20.1
        search:
        - shiraz.local
      routes:
      - to: "default"
        via: "192.168.20.1"
    ens35:
      dhcp4: no
Apply the configuration:
bash
netplan apply
Bring up ens35 explicitly on both nodes:
bash
ip link set ens35 up
Verify:
bash
ip -br a
Expected: • ens34 has IP (controller/compute management) • ens35 is UP but with no IP
1.2 Prepare Disk for Cinder (Controller Only)
On the controller node, attach an extra disk (e.g., /dev/sdb) and prepare it for Cinder LVM:
bash
lsblk
					pvcreate /dev/sdb
vgcreate cinder-volumes /dev/sdb

pvs
vgs
2. Setup SSH Access
On the controller (as kolla):
bash
sudo -iu kolla
then:
bash
					ssh-keygen -t ed25519 -N "" -f ~/.ssh/id_ed25519
ssh-copy-id kolla@192.168.20.11   # controller
ssh-copy-id kolla@192.168.20.12   # compute
Verify:
bash
					ssh kolla@controller exit
ssh kolla@compute exit
3. Install Kolla-Ansible in Virtual Environment
On the controller, switch to kolla user:
bash
cd ~
Create the Python venv:
bash
/usr/bin/python3.12 -m venv --copies ~/venv
Activate the venv:
bash
source ~/venv/bin/activate
Upgrade tools:
bash
pip install -U pip setuptools wheel
Install Ansible inside venv:
bash
pip install -U ansible-core
Install Kolla-Ansible (Dalmatian stable branch):
bash
pip install git+https://opendev.org/openstack/kolla-ansible@stable/2025.1
Install system dependencies:
bash
kolla-ansible install-deps
4. Inventory & Configuration
Generate configs and inventory:
bash
					sudo mkdir -p /etc/kolla

sudo cp -r ~/venv/share/kolla-ansible/etc_examples/kolla/* /etc/kolla/

sudo cp ~/venv/share/kolla-ansible/ansible/inventory/multinode ./inventory
Open the inventory file for editing:
bash
vi ./inventory
ini
					[control]
controller ansible_host=192.168.20.11 ansible_user=kolla

[network]
controller

[compute]
compute ansible_host=192.168.20.12 ansible_user=kolla

[monitoring]
controller

[storage]
controller ansible_host=192.168.20.11 ansible_user=kolla
5. Configure Globals & Passwords
Generate passwords:
bash
					sudo chown -R kolla:kolla /etc/kolla
kolla-genpwd
chmod 0600 /etc/kolla/passwords.yml

ll /etc/kolla/passwords.yml
Edit:
/etc/kolla/globals.yml
yaml
					kolla_base_distro: "ubuntu"
kolla_install_type: "source"
openstack_release: "2025.1"   # Stable Dalmatian release

kolla_container_engine: "docker"

network_interface: "ens34"
neutron_external_interface: "ens35"

# Map external physnet to br-ex
neutron_bridge_mappings: "physnet1:br-ex"

kolla_internal_vip_address: "192.168.20.254"
enable_haproxy: "yes"
neutron_plugin_agent: "openvswitch"

# Enable Cinder with LVM backend
enable_cinder: "yes"
enable_cinder_backend_lvm: "yes"
cinder_volume_group: "cinder-volumes"
enable_neutron_provider_networks: "yes"
enable_cinder_backup: "no"

# Optional storage
# enable_swift: "yes"
6. Test Ansible Connectivity
bash
ansible -i ./inventory all -m ping
Expected: “pong” from controller and compute.
7. Bootstrap & Deploy OpenStack
On controller (as kolla, with venv active):
bash
kolla-ansible bootstrap-servers -i ./inventory
kolla-ansible prechecks -i ./inventory
kolla-ansible deploy -i ./inventory
kolla-ansible post-deploy -i ./inventory
8. Verify Core Containers
bash
					ip a show ens34 | grep 192.168.20.254 || echo "VIP missing"

sudo docker ps --format "table {{.Names}}\t{{.Status}}" | egrep -i \
"mariadb|rabbitmq|memcached|keystone|horizon|glance|neutron|nova|placement|haproxy|kolla-toolbox|cinder"
Expected: All containers Up (healthy).
9. Install OpenStack CLI Clients
Inside venv:
bash
					pip install -U python-openstackclient \
               python-novaclient \
               python-neutronclient \
               python-glanceclient \
               python-cinderclient \
               openstacksdk \
               osc-placement
10. Source Credentials & Verify Deployment
bash
					source /etc/kolla/admin-openrc.sh

openstack endpoint list
openstack compute service list
openstack network agent list
openstack volume service list
openstack --os-placement-api-version 1 resource provider list
✅ All services should be up, agents alive, and compute resource visible.
11. Create Your First Network, Image, and Instance
11.1 Provider Network
bash
					openstack network create --external --provider-physical-network physnet1 \
    --provider-network-type flat public1

openstack subnet create --network public1 \
    --subnet-range 192.168.20.0/24 \
    --allocation-pool start=192.168.20.100,end=192.168.20.200 \
    --gateway 192.168.20.1 \
    --dns-nameserver 192.168.20.1 \
    public1-subnet
11.2 Flavor
Define Flavors:
bash
					openstack flavor create --id 1 --ram 1024 --disk 10 --vcpus 1 m1.small
openstack flavor create --id 2 --ram 2048 --disk 20 --vcpus 2 m1.medium
11.3 Image
bash
					# Download the latest Ubuntu Noble (24.04) cloud image in qcow2 format:
wget https://cloud-images.ubuntu.com/noble/current/noble-server-cloudimg-amd64.img -O ubuntu-noble.qcow2

# Upload the image into OpenStack Glance so it can be used to launch VMs
openstack image create "Ubuntu-Noble" \
    --file ubuntu-noble.qcow2 \
    --disk-format qcow2 \
    --container-format bare \
    --public
11.4 Key Pair
Create a Keypair (for SSH access to the VM):
bash
					ssh-keygen -t ed25519 -f ~/.ssh/id_ed25519_openstack -N ""
openstack keypair create --public-key ~/.ssh/id_ed25519_openstack.pub mykey
11.5 Volume
bash
openstack volume create --size 5 first-volume
11.6 Launch Instance
Launch an Instance:
bash
					openstack server create --flavor m1.small \
    --image "Ubuntu-Noble" \
    --nic net-id=$(openstack network show public1 -c id -f value) \
    --key-name mykey \
    --block-device-mapping vdb=first-volume:::1 \
    first-vm1
Check the VM status:
bash
openstack server list
11.7 Verify VM Connectivity (Flat Provider Network)
In this setup, instances get an IP address directly on the physical LAN. Floating IPs are not required. Instead, you just need to make sure that your VM is ACTIVE and that your Security Group allows ICMP (ping) and SSH.
1. Check the VM status
bash
openstack server show first-vm1 -c name -c status -c addresses -c key_name -c project_id
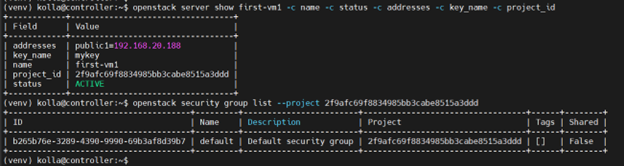
Look for:
- status = ACTIVE
- addresses shows an IP from 168.20.0/24 (e.g., 192.168.20.188)
- key_name = mykey
- project_id = <PROJECT_ID> ← note this value
2. Find the Security Group for the project
Use the <PROJECT_ID> from above:
bash
openstack security group list --project <PROJECT_ID>
This will show the Security Groups for that project. Usually there is one called default. Copy the ID value → this is your <SEC_GROUP_ID>.
3. Add rules to allow ping and SSH
Replace <SEC_GROUP_ID> with the actual ID:
bash
					# Allow ICMP (ping)

openstack security group rule create --proto icmp <SEC_GROUP_ID>

# Allow SSH (TCP port 22)

openstack security group rule create --proto tcp --dst-port 22 <SEC_GROUP_ID>
4. Confirm the VM is attached to the Security Group
bash
openstack server show first-vm1 -c security_groups
You should see name=’default’ (or the group you modified).
5. Test connectivity
bash
					ping <INSTANCE_IP>
ssh -i ~/.ssh/id_ed25519_openstack ubuntu@<INSTANCE_IP>
If successful, you should be able to log in to the VM as the ubuntu user.
6. (Optional) Verify the attached volume
Inside the VM:
bash
lsblk
You should see /dev/vdb. Format and mount it if needed:
bash
					sudo mkfs.ext4 /dev/vdb
sudo mkdir /mnt/data
sudo mount /dev/vdb /mnt/data
12. Access Horizon Dashboard
Get Keystone admin password:
bash
grep keystone_admin_password /etc/kolla/passwords.yml
Open in browser:
http://192.168.20.254
Login: • User: admin • Password: (value from keystone_admin_password)
13. Create and Attach Volume in Horizon Dashboard (Alternative to CLI)
Instead of using the CLI, you can manage block storage (Cinder volumes) through Horizon:
- Log in to Horizon – URL: http://192.168.20.254 – User: admin (or your project user) – Password: from keystone_admin_password
- Create a Volume – Go to Project → Volumes → Volumes → Create Volume – Enter a name, e.g. first-volume – Set Size = 5 GB – Click Create Volume – You should now see it in the volume list with status Available
- Launch a New Instance (or use an existing one) – Go to Project → Compute → Instances → Launch Instance – Select flavor, image, network as usual – (You can also choose to attach a volume directly during launch)
- Attach Volume to Instance – Once the instance is running, go back to Project → Volumes → Volumes – Click the dropdown next to first-volume → Manage Attachments – Select your instance (e.g., first-vm1) → Attach Volume – The status should change to In-Use
- Verify Inside the VM – SSH into the instance:
bash
ssh -i ~/.ssh/id_ed25519_openstack ubuntu@<INSTANCE_IP>
– Run:
bash
lsblk
– You should see the attached disk (e.g., /dev/vdb). – Format and mount if needed:
bash
					sudo mkfs.ext4 /dev/vdb
sudo mkdir /mnt/data
sudo mount /dev/vdb /mnt/data